Organizations regularly have repeatable or recurring work/task that could be easily accomplished with a series of tasks for various objects in Salesforce. For example, a process to create a series of new tasks whenever a new client is onboarded. These recurring series tasks can be created from a template. Users should be able to create templates for the tasks. Once the template is created, users should be able to easily apply the template each time when the same process is required in the future. This would eliminate any duplicate efforts involved with creating the tasks.
To implement this feature, we can use Action Plan. Action Plan is an open Source software, and it is an unmanaged package. It helps to create a series of tasks on various objects. Since it is an unmanaged package, you can customize according to the business needs.
You can create Action Plans for the following objects in Salesforce (varies by edition):
- Accounts
- Contacts Leads
- Opportunities
- Campaigns
- Contracts
- Cases
- Person Accounts
Tasks can be set up with a timeframe, can assign it to a team member, and set up a workflow to deliver the reminder emails. The solution is templatized, so if you want to apply the same set of actions to a set of (i.e. Accounts), you can do this in clicks. Action Plans can incorporate up to 75 tasks and you can create up to 40 plans at a time. We can remove up to 65 Action Plans at a time.
After Installing the Action Plan, it is easy to get started. For each object, you need to add a button to the list view and add a button to the detail page. For e.g. Accounts, follow the steps are given below.
Action Plans Button Settings
1. How to create an Action Plan Button?
Navigate to the Action Plans Templates tab. Then, click the “New Action Plan Template” button. The steps given below for your reference:
- Navigate to Setup > Customize > Accounts > Search Layouts.
- Click Edit near Accounts List View.
- Move the Create Account Action Plans button from Available Buttons to Selected Buttons.
- Click Save.
- Navigate to Setup > Customize > Accounts > Page Layouts.
- Note: the package includes a default Action Plan Layout for your reference.
- Click on Edit near one of your standard Account Page Layouts.
- Add the Action Plans related list to the page.
- Edit the properties of the related list by clicking the configuration button above it.
- Expand Buttons section, unmark New checkbox and move Create Account Action Plan to the Selected buttons.
- Update the fields in the related list to meet your needs. The Recommended fields include Start Date, Overall Task Status, Owner First Name, Owner Last Name.
- Click Save.
2. How to create an Action Plan Template?
Navigate to the Action Plans in the App. Then, click on the Action Plan Template tab to create a New Template for Action Plan.
- Name – Template Name.
- Description – An explanation about the template, how it is used.
- Skip weekends – Allows you to automatically reschedule a task that would fall on a Saturday or a Sunday to either a Monday or Friday. When it is checked, a drop-down box will appear allowing you to select the day.
- Subject – Purpose of the task.
- Days After- This value determines the due date of the task.
- For tasks with no dependency, the task’s due date will be offset from the plan start date.
- For tasks with a dependency, the due date will be offset from the expected due date of the task on which it depends on.
- Assigned To – Looks up to the user. If you want to assign the task dynamically then you need to leave the field blank. When assigning dynamically, the default behavior will assign the task to the running user. You can also make system assign it to the record owner by changing your Action Plan Settings. To do that Go to Setup/ Develop/ Custom Settings then click Manage next to Action Plan Settings. If a Default Organization Level Value setting has not yet created, simply click the new button. In the Edit page, you will be able to mark the check box named- Unassigned Task Defaults to Record Owner, and then Save it.
- Category – Let you know what type of activity.
- Priority – Low, Medium or High.
- Email – Send a standard New Task email when it is checked. For Tasks depending on others, the email will be sent when the task is created.
- Reminder – This check boxes will define the default behavior for reminders when applying the template to create an Action plan.
- If it is left unchecked, in the Action Plan Creation page the reminders will be initially disabled
- If it is checked, the reminders will be available. (Reminders take in consideration.)
- Add New Task – Adds an additional row to the tasks grid if needed.
- Save – Saves the template.
Use Action Plans: Example – Create Action Plans for Account
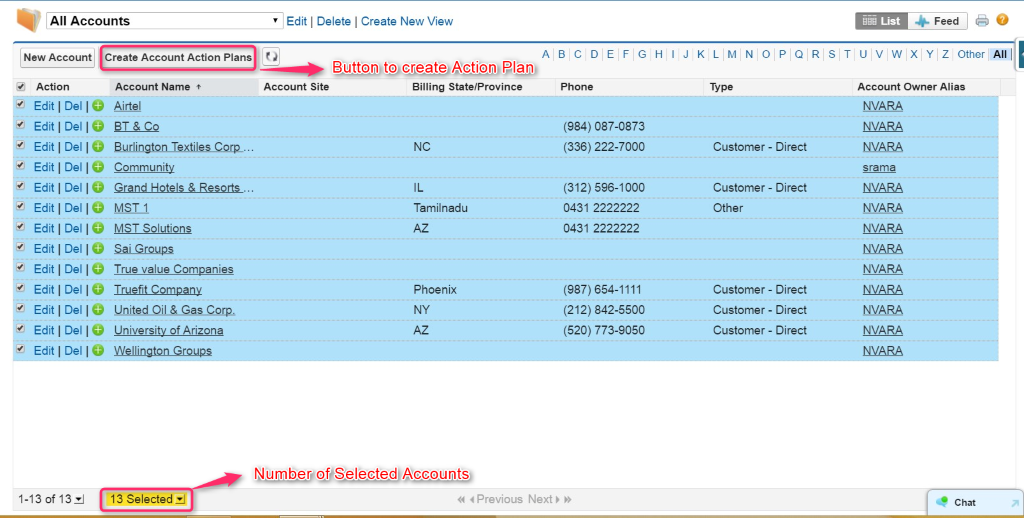
Step 1: First Navigate to the Account List View. Select the Accounts, which you need to create Action Plan.
Step 2: You need to select the Template by typing the name on the lookup and clicking on the template which was created earlier.
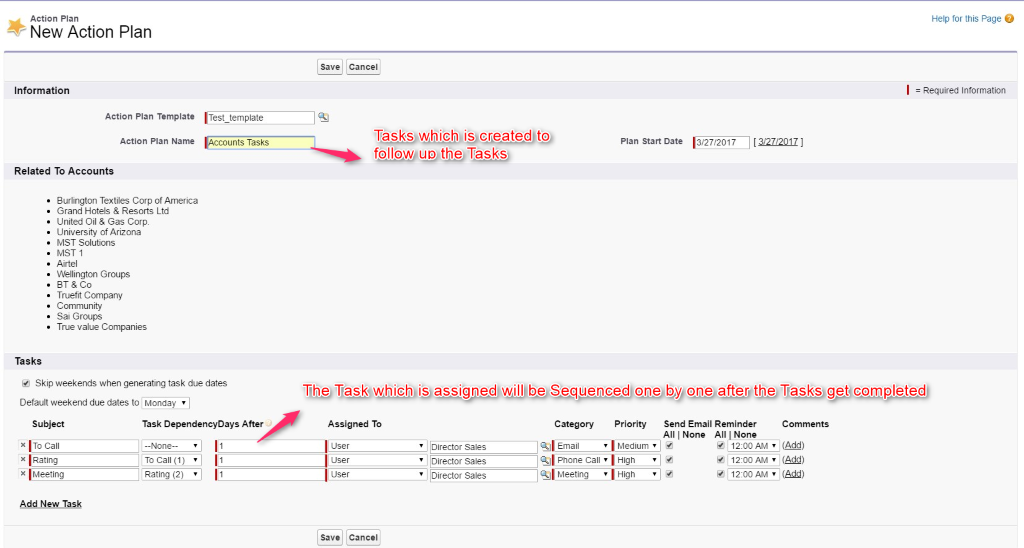
Step 3: Enter the information specific to this plan. Please note that the accounts you selected earlier are visible and that the “Assign To” has been completed by using the users selected.
Step 4: Saving the Action Plan.
Note: The batch process handles Creation of Action plan, so it may take a couple of minutes to view all created objects. After saving the Action plan, we can check the status of the Tasks which are assigned to the users.
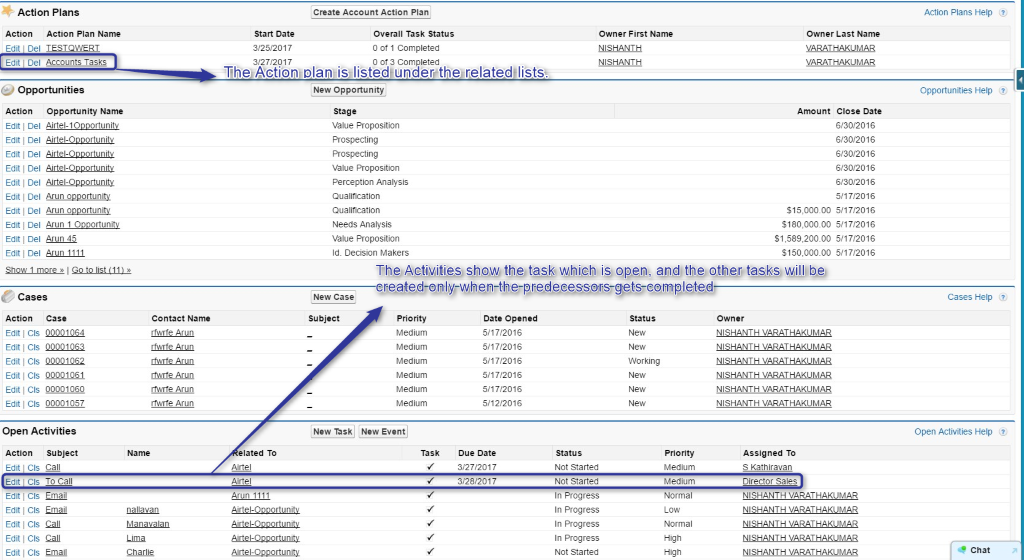
Step 5: Verifying the Action Plan and the Tasks. Check Action Plan is in the related lists. It will have two open activities. The other activities in the template will be created only when the previous ones get completed.
Conclusion
Should we use Action plan in Salesforce to enhancethe reusable and shareable template? I agree that we can use the Action plan to eliminate duplicate recurring tasks creation and it saves our time.
