Salesforce Article Management.
Salesforce knowledge is the most interesting and most popular feature today. I am here to share with you some of the key steps to Import Articles into Salesforce Knowledge, but before I do that, let me ask you a question. In your organization today, how many times that you search for a relevant piece of information? It may be an article, or a FAQ, or a tutorial in order to solve a specific type of customer problem. How many times you are not able to find that information because it is buried either in your hard drive, or emails, or somewhere else. For these kinds of challenges, Salesforce Knowledge will play a tremendous role to help address these challenges. So, with this context let me jump into the process of Article import into Salesforce Knowledge.
Below are four key steps to Import Articles into Salesforce Knowledge.
- Make a .csv file for each Article type
- Create .properties file
- Create .zip file
- Upload .zip file into Salesforce
Making a .csv file for each Article type:
To import articles, you should have “Manage Salesforce Knowledge”, “Manage Articles”, “Manage Knowledge Article Import/Export” permissions enabled in your profile also “Read, Create, Edit, Delete” permission on the article type.
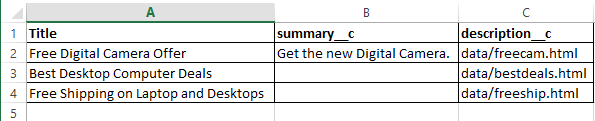
Create separate .csv file for each article type, and there should be only one .csv file and one .properties file per article type. These two files should be in the root directory. In the first row of the csv file, specify the article type’s fields. If the article has some HTML contents, then the article type should have a rich text area field. For this article, I am going to have description__c as rich text area field.
Enter the article data for each field except for rich text area field description__c because that column should have the relative path to the corresponding .html file in your .zip file. You need to create a separate folder for .html files and images. For this article, I am going to use /data folder to hold all .html files and /data/images folder to hold all image files.
If your article contains images, include them in your .html file using <img> tag and src attribute. Make sure that the src value is a relative path to the image file. The supporting image formats are .png, .gif and .jpeg and the size should not exceed 1MB.
As of now the source .csv file looks like this
We are done with .csv file creation. Let’s see how to create .properties file.
Creating .properties file:
Here, we must specify Date format, Encoding format, Separator ,and so on. These are called import parameters and it should be represented by key and its corresponding value. Let us create a property file as described in this table.
| Key | Description | Default Value |
| DateFormat | Format of the date to read in the .csv file | yyyy-MM-dd |
| DateTimeFormat | Format of the date and time to read in the .csv file | yyyy-MM-ddHH:mm:ss |
| CSVEncoding | Character encoding used to read the .csv file | ISO8859_15_FDIS |
| CSVSeparator | .csv file separator | , |
| RTAEncoding | Default encoding used for the HTML files (if not specified in the charset attribute from the HTML meta tag). | ISO8859_15_FDIS |
We are almost there. To complete the import, create a .zip file as below
Creating .zip file:
The .zip file must have following things in it:
1. The .csv file
2. The folder containing the .html files to import
3. The folder containing the image files referenced in the .html files
4. The .properties file
Upload your .zip file:
- Log in to Salesforce, go to Setup -> Data Management -> Import Articles
- Select the appropriate Article Type
- Click Browse to select the .zip file and click OK.
- Click Import Now.
When the import is complete, you will receive an email with an attached log that provides details about the import.
Reference:
