Rendering
The power of Lightning web component is templating system, which uses the virtual DOM to render components smartly and efficiently. To render HTML conditionally, add the if: true|false directive to a nested <template> tag that encloses the conditional content. The if:true|false={property} directive binds data to the template and removes and inserts DOM elements based on whether the data is a true or false value
Create Lightning Web Component
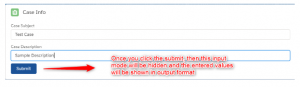
Create a Lightning web component using the following SFDX command. In this component, we will be showing the input values with a button. Once the values are entered and button is clicked, then the entered values will be shown in output format.
sfdx force:lightning:component:create –type lwc -n ConditionalRendering -d force-app/main/default/lwc
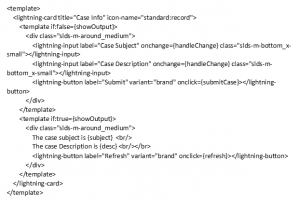
ConditionalRendering.html
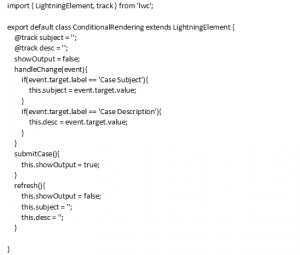
ConditionalRendering.js
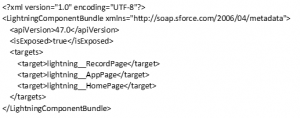
CoditionalRendering.js-meta.xml
Push the changes to Scratch Org
You can push the changes to a scratch org using the below command and add this component to either record page or home page or app page using Lightning app builder
sfdx force:source:push
If you want to add this component in lightning record page alone, you can specify the lightning__RecordPage only in the meta data file. If isExposed is false, the component is not exposed to Lightning App Builder or Experience Builder. To allow the component to be used in Lightning App Builder or Experience Builder, set isExposed to true and define at least one <target>, which is a type of Lightning page.
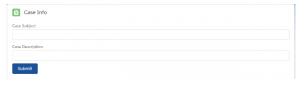
Output

Navigation
Use the navigation service, lightning/navigation to navigate to many different page types, like records, list views, objects and lightning component. Instead of URL, the navigation service uses a PageReference. A PageReference is a JavaScript object that describes the page type, its attributes, and the state of the page.
A component calls this[NavigationMixin.Navigate] to navigate to another page in the application.
To use the navigation service, we should import the lightning/navigation module in the component’s JavaScript class.
import { NavigationMixin } from ‘lightning/navigation’;
Then, Apply the NavigationMixin function to your component’s base class.
export default class navigationExample extends NavigationMixin(LightningElement) {}
To dispatch the navigation request, call the navigation service’s [NavigationMixin.Navigate](pageReference,[replace]) function
this[NavigationMixin.Navigate]({
type: “standard__component“,
attributes: {
componentName: “c__DESTINATION_AURA_COMPONENT“
},
state: {
// You can pass any key and value in the state object.
//The key must include a namespace, and the value must be a string.
}
});
Example:
The below example shows that how to navigate from one component to another component. The source component is an LWC component and the destination component is an Aura component.
Step 1: Create an Aura Component
NavigateAura.cmp
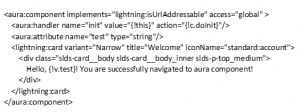
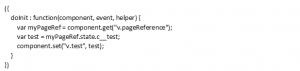
NavigateAuraController.js
Step 2: Create a Lightning Web Component
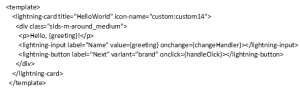
HelloWorld.html
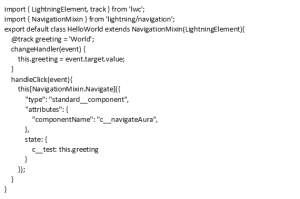
HelloWorld.js
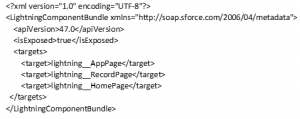
HelloWorld.js-meta.xml
Step 3: Push the web components changes to scratch org
You can push the changes to scratch org using sfdx force:source:push command
Step 4: Place the component
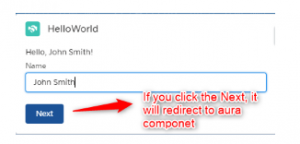
You can place the HelloWorld component in either app page or record page or home page using the Lightning app builder.
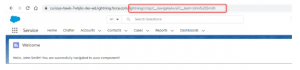
Output
lightning:isUrlAddressable
In the aura component, we have used lightning:isUrlAddressable interface. The purpose of this interface is to enable direct navigation to a lightning component via URL.
A component that implements lightning:isUrlAddressable gets access to the page state through the PageReference attribute. The page state is a representation of the current URL query parameters.
References
https://developer.salesforce.com/docs/component-library/documentation/en/lwc/lwc.use_navigate_basic
https://developer.salesforce.com/docs/component-library/documentation/en/lwc/lwc.create_conditional
