Salesforce CPQ Product Rule helps Sales reps in many ways to sell the right product to customers. For example, a sales rep is selling a bundled product named ‘Desktop for Home’ to the customer. Will the Desktop Computer without keyboard be helpful to customer? In this case, Salesforce CPQ product rule helps Sales rep to sell ‘Desktop for Home’ product without missing keyboard.
There are four types in product rules:
- Validation
- Alert
- Selection
- Filter
Validation
Now, we are going to create a validation rule to stop sales reps from selling a desktop computer without keyboard.
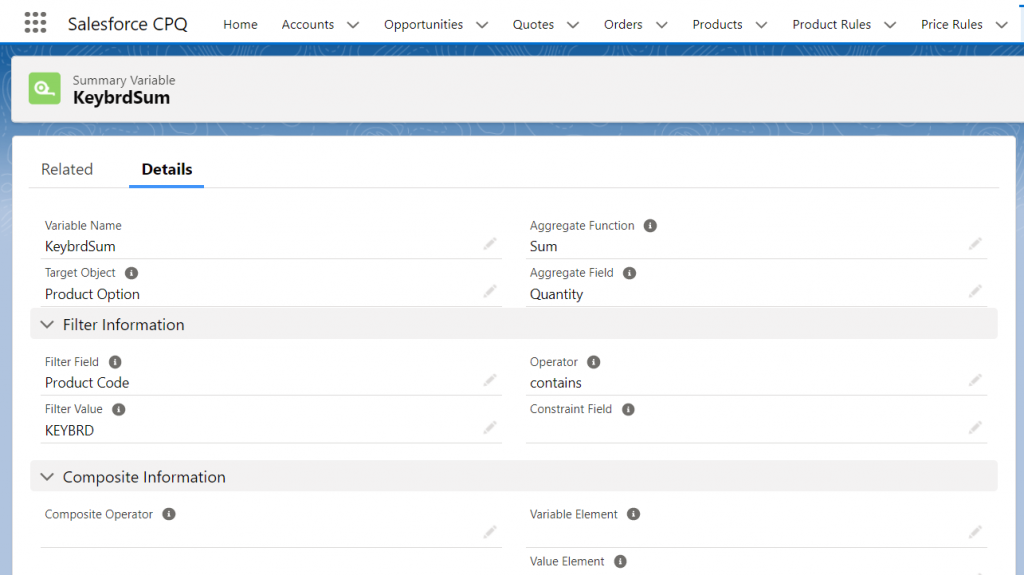
- Create a Summary Variable
- Go to Summary Variable tab
- Click New
- For Variable Name, enter the appropriate name. In this example, Variable name is set as KeybrdSum
- For Target Object, Choose Product Option
- For Aggregate Function, choose Sum.
- For Filter Field, choose Product Code.
- For Operator, choose contains
- For Filter Value, enter KEYBRD
- Click Save
- Create a Product Rule
- Go to Product Rule tab
- Click New
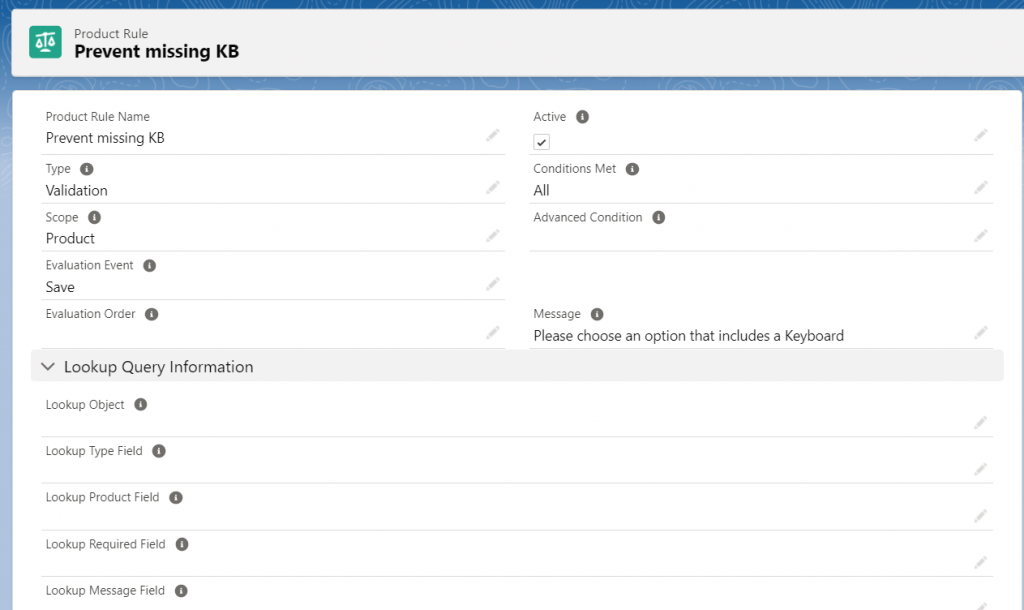
- For Product Rule Name, enter Prevent missing KB
- For Type, choose Validation
- For Scope, choose Product.
- For Evaluation Event, choose Save.
- Check Active.
- For Conditions Met, choose All.
- For Message, enter Please choose an option that includes a Keyboard
- Click Save
- Create an Error Condition
- In the Error Condition related list, click New.
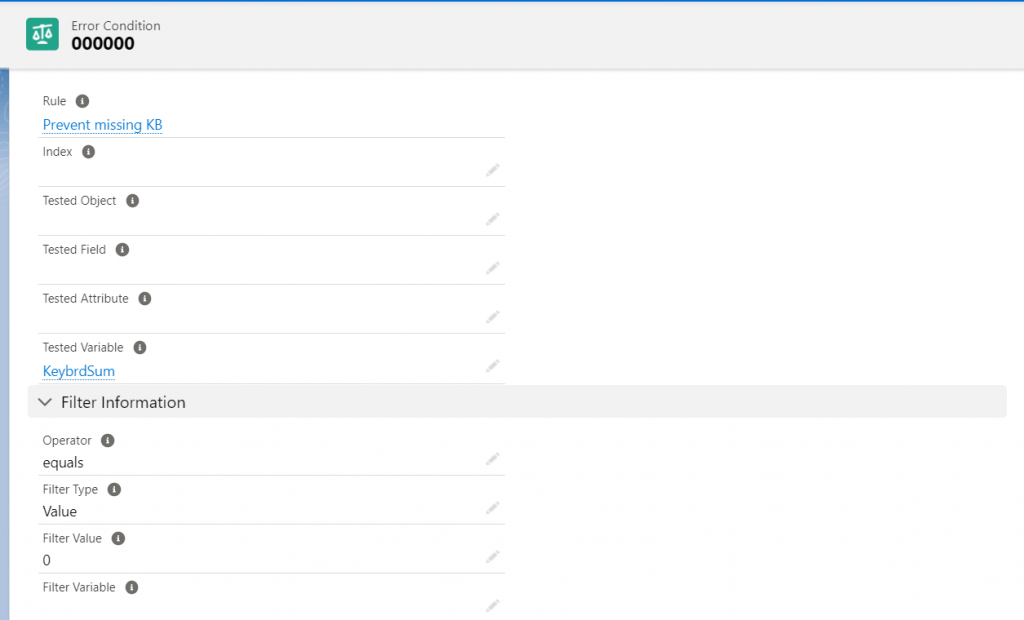
- For Tested Variable, look up and choose KeybrdSum.
- For Filter Operator, choose equals.
- For Filter Type, choose Value.
- For Filter Value, enter 0.
- Click Save.
- Create a Configuration Rule
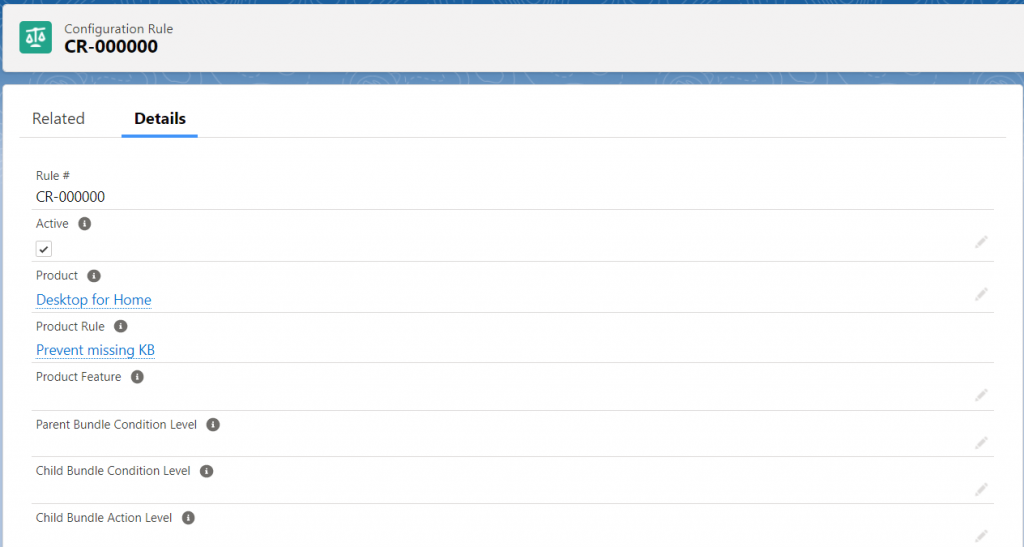
- In the Configuration Rule related list, click New.
- Check Active.
- For Product, look up and choose the product where you want to apply this product rule. For this example, Desktop for Home product bundle with Key board product options have been selected to apply this product rule.
- Click Save.
Let us test this Product rule (Validation) by adding the ‘Desktop for Home’ product bundle without choosing the keyboard product option.
- Go to Quote records created for testing.
- Click Edit Lines
- Click Add Products
- Select the Desktop product bundle and leave any keyboard product option unchecked.
- Click Save
You can see that the error message as shown below.

Alert
To experience/test the alert product rule, just change the type to Alert in the product rule used in example for Validation.
The difference between alert and validation in product rule is that Validation will not allow user to save quote or configuration until the record meets predetermined conditions. If you choose alert, user will be alerted with the message, but user can continue without making any changes.

Selection
Selection Rule will automatically add, remove, hide, enable, or disable options in bundle.
Now, we are going to create a Selection Product Rule to automatically add USB Thumb drive product to the quote whenever a Sales rep adds a monitor to the quote.
Create a product rule.
- USB thumb drive
- Type – Selection
- Scope – Quote
- Evaluation Event – Always
- Active – True
- Condition Met – Any

Create an Error Conditions:
- Tested Object – Quote Line
- Tested Field – SBQQ__ProductCode__c
- Operator – Starts With
- Filter Type – Value
- Filter Value – monitor

Create a Product Action
- Type – Add
- Product – Choose the product that you want to add automatically (For this example, USB Thumb Drive) has been selected.
- Required – TRUE

Let us test this selection rule by adding a monitor to a quote. If you add a monitor to the quote, USB Thumb Drive will be automatically added to quote.

Filter
Filter Product rule helps us to create dynamic bundles.
In this example, we are going to provide dynamic list of options to the Sales rep when they add the product ‘Laptop’ to the quote.
Create a checkbox field in product option object. For this example, a checkbox named Addon__c has been created.
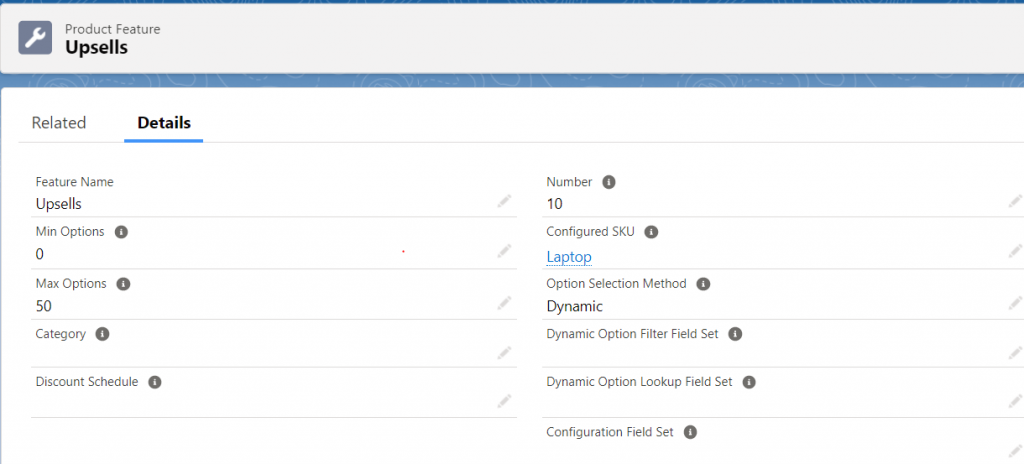
Create a Feature for the product for which you want to display list of options, as shown below.
Create a Product Rule
- Go to Product Rule tab. Click New
- For Product Rule Name, enter an appropriate name.
- For Type, choose Filter.
- For Scope, choose Product.
- For Evaluation Event, choose Load.
- Check Active.
- For Conditions Met, choose All.
- Click Save.

Create Product Action
Note: Before creating product action, add an API name of the created checkbox to Filter Field of Product Action.
- In the Actions related list, click New.
- For Type, choose Default Filter.
- For Filter Field, choose Addon__c.
- For Operator, choose equals.
- For Filter Value, enter true.
- Click Save.
Create a Configuration Rules related list
- In the Configuration Rules related list, Click New
- Check Active.
- For Product, look up and choose ‘Laptop’
- For Product Feature, look up and choose Upsells.
- Click Save
To test this Filter product rule, let us follow the steps.
Go to Quote -> Click Edit Lines -> Add Products -> Add Laptop

Click Add Options

You can add the Printer to the quote by selecting and clicking add.
This article explains each type of product rule with simple examples. This article does not cover everything related to product rule. To learn more about product rule, please refer the links below.
References:
https://help.salesforce.com/articleView?id=sf.cpq_product_rules.htm&type=5
https://trailhead.salesforce.com/content/learn/modules/product-rules-in-salesforce-cpq


